Showing posts with label fabric choices. Show all posts

Thursday, March 16, 2017

Baltimore on the Prairie 2017, Nebraska City, NE

Baltimore on the Prairie
*** Applique Conference ***
September 20-23, 2017
Lied Lodge and Conference Center
Nebraska City, NE


Once again, I am very excited to be teaching two workshops at Baltimore on the Prairie (September 20-23, 2017).

A well known teaching faculty has been assembled for 2017: Nancy Amidon, Barbara Burnham, Jeana Kimball, Lisa DeBee Schiller, and Cathy Van Bruggen. Classes cover all skill levels from the very beginning basics to advanced Baltimore techniqes.


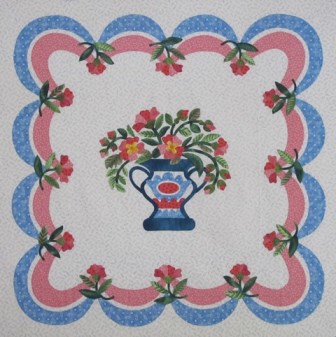
For my workshops, we chose two applique blocks drawn directly from the antique quilt in Baltimore Garden Quilt, and updated them with new fabrics and  new techniques.
Here is a preview of some techniques I will offer:


Choose from layered or multilayered flowers with dimensional folded buds,

or try edge ruching method for dimensional flowers and buds.


Fussy cut fabrics or add broderie perse flowers. 

Sew perfectly round padded circles, French knots, fancy fringes, or criss-cross centers.


Choose from several methods to make stems and arrange them in graceful curves. Learn to applique bumpless curves, sharp points and V's, how to handle small appliqué pieces, and tips to make hand appliqué faster and neater. I use a video projection system so all students can watch techniques up close. I hope you can join us!

Keep Stitching!
Barbara M. Burnham
www.barbaramburnham.com
(c) 2017 Barbara M. Burnham. All rights reserved. Reproduction of any kind is expressly prohibited without prior written authorization.

Monday, June 20, 2016

New Block Finish and Book Sale

Between preparing samples and handouts for applique workshops, and working full time, it seems I hardly ever have time to stitch for myself. But I have finally finished stitching this block from Baltimore Garden Quilt in a new colorway, just for fun!


To celebrate, I’m offering SALE PRICES for my Baltimore Garden Quilt book. Check out the Store on my website for this book and others, plus some new patterns available.

 A favorite fabric is a great way to be inspired to applique -- this little warbler fabric has been in my stash for years, waiting for just the right project. The butterflies are cut from a more recent fabric I found in a local quilt shop, SpringWater Designs in Columbia, MD. (I will be teaching the Bluebird Wreath workshop there in July.)
In an earlier post about choosing fabrics for applique, I showed this little bird fabric that I wanted to feature, and some of the ‘first draft’ companion fabrics for this block. You can see, of course, most of them did not make the final cut.


Students always ask to see the back of my applique - here's a closeup back and front.


Aren’t we fortunate to have a multitude of beautiful fabrics available today? Here is the same block on the original 1848 quilt, on which the Baltimore Garden Quilt book and patterns are based. I can only hope to hand quilt my applique as beautifully as the original.


Keep Stitching!
Barbara M. Burnham

www.barbaramburnham.com
P.S. The bird fabric is "Bittersweet" by Moda. The butterfly is "Sue Schlaback of Wild Apple for Timeless Treasures.
(c) 2015 Barbara M. Burnham. All rights reserved. Reproduction of any kind is expressly prohibited without prior written authorization.


Monday, January 4, 2016

Choosing Fabrics for Applique Blocks


Applique students often ask me how I choose fabrics. That's a difficult question to answer. If you are trying to reproduce an antique quilt, or trying to match a photo that comes with a pattern, most of the fabric decisions are fairly easy - it’s just a matter of finding similar fabrics.


For this vase block in my book, Baltimore Garden Quilt, fabric choices were easy by following the antique quilt (also shown here) with reproduction fabrics available at the time.


If you want another color scheme, there are many inspirations and fabric choices.  It helps to know a bit about contrast, value, intensity, but there are no right or wrong choices, as long as the end result pleases YOU. Helpful books for learning to choose fabrics: Jinny Beyer's "Color Confidence for Quilters" and "The Scrap Look." Joen Wolfrom has also written several wonderful books on choosing color schemes for quilts.


This Baltimore Garden Vase is one of the blocks I will be teaching at the 2016 Academy of Appliqué, in Williamsburg, VA, so I am working up some different samples. One version is a simple color scheme in shades of pink and blue.

For another version, I want to find a feature fabric to make the vase center a focal point. Auditions begin with a pattern window cutout for the vase center.  Some fabrics are more promising than others.  This white dove could inspire a Christmas version.
 
A horse racing theme might be fun.

Chickens are popular, and the black background offers nice contrast.


I love bluebirds, but these are rejects – the birds get lost in a confusing background.


A bluebird with nest is too big – another reject.


But this little warbler has real potential! So I will cut this applique piece to feature her. Next step is to start finding fabrics to coordinate with her --


-- looking for bright red, red-orange, orange to gold, and greens from light to dark with olive tones. I won’t use them all, though. 


Appliqué takes a lot of your time and effort, and fabric costs $$$, so you might want an idea of what your final result will really look like before investing your efforts. Stacking fabrics that blend and coordinate is a good way to start.
For a complex block, I might take the time to paste a mockup – rough cutting chunks of fabric, and pasting them with gluestick to a pattern copy. The paper mockup will be my guide for fabric cutting and stitching, as well as inspiration on my sewing room wall.

There are many ways to approach fabric selection for applique - this is just one example. I'll try to post some more ideas soon.

Keep Stitching!
Barbara M. Burnham
www.barbaramburnham.com
(c) 2015 Barbara M. Burnham. All rights reserved. Reproduction of any kind is expressly prohibited without prior written authorization.


Tuesday, February 24, 2015

Applique A Tiny Bird's Eye

Several people have asked me to do a blog post about how I manage hand appliqué on a tiny bird’s eye. And they keep reminding me. (These things take time!) So here it is.

First, enjoy shopping for just the right fabric for your bird’s eye! On antique Baltimore album quilts, a daisy-like flower might be cut out and sewn as a bird’s eye. I appliqued this tiny flower which made a 1/8” circle – quite challenging!


This fish’s eye was the center of a large flower. His upper lip was appliquéd with the technique explained below.

Polka dots are great if you find just the right size. Circles and ovals provide a nice guideline to appliqué. This eagle's eye seems to have eyelashes.

Here's a wild bird eye! Wish I had more than a scrap of this fabric....

The little block design below was clipped from the full-size block in my Baltimore Garden Quilt book, for a workshop on basics of appliqué with freezer paper on top, tricks and techniques for leaves, skinny stems, stuffed cherries, and a tiny bird’s eye.

The black polka dot is the perfect size for my bird’s eye, and its white background allows me to include a white eye-ring which shows up nicely against the bird. But it’s still really small to applique! Here is the trick: Usually I cut an appliqué seam allowance about 3/16 inch. However, for tiny appliqué, cut out the appliqué fabric with a HUGE seam allowance. Knot a thread, and baste all around the eye. End the basting thread with another knot.

If a white eye-ring is desired, use a circle template to mark a bigger circle. Depending on your fabric, you might not need that, such as the eagle with eyelashes shown above.

Clip out one or two basting stitches – just enough to trim a LITTLE BIT of the HUGE seam allowance down to 3/16 inch (or less) for ONE STITCH of appliqué. The remaining basting stitches will hold the fabric in place while you begin to sew.
 

Thread the needle with appliqué thread and knot the end. Insert the appliqué needle under the eye fabric (so the knot will be hidden) to begin the first appliqué stitch. Turn the seam allowance under and send the needle to the back of the block. Pull the thread taught and then park the needle.


That first appliqué stitch is now holding one side of the eye in place while the remaining basting stitches are still holding the other side.

At that point, you must clip out more basting, and trim more seam allowance away before you can continue around the circle. The appliqué stitches must be very close together. Instead of the usual horizontal appliqué stitch, send the needle straight up and down vertically for each stitch. You might call it a stab stitch. 
About halfway around, all basting will be gone, but the eye will be stable. From there on, trim carefully and appliqué until the last bit is turned under. This is probably the most difficult part. The seam allowances have to be very small – all the seam allowances have to be cut narrow enough to fit under their its part of the circle.

TIPS: On this tiny appliqué, concern yourself with only one single stitch at a time. Trim only enough and turn under only enough seam allowance for that one stitch. Use the needle to wipe the seam allowance under. Slide the tip of the needle under the circle to smooth the gathers. If too much is pushed under, flattening the circle, use the tip of the needle to coax it out a bit before taking the stitch. Push in any bumps with a fingernail or a toothpick. Hold the block at the eye between your finger and thumb and press to flatten the gathered turnunder (finger press).
Finished! If there are a few bumps in the applique, you can still push those bumps in with the needle, a toothpick, or a fingernail, and take an extra stitch or two.

In my book Baltimore Garden Quilt, there are more ways to make use of this method. Try this technique on a bird’s eye, or any small appliqué piece. I would love to see your photos – visit me on Facebook. And watch for a future post on embroidered bird eyes.

Keep Stitching!
Barbara M. Burnham

www.barbaramburnham.com

(c) 2015 Barbara M. Burnham. All rights reserved. Reproduction of any kind is expressly prohibited without prior written authorization.

Tuesday, November 18, 2014

Cherry Birds and Running Reds


One of my favorite blocks from “Baltimore Garden Quilt”* is this Cherry Bird block. I started this one for teaching a hand applique workshop in Chattanooga, Tennessee, at the American Quilter’s Society’s QuiltWEEK event. Now I can finally finish stitching the rest of this block. Just one little problem...


I do not make any marks on my background fabric, so there are no marks remove; however, by the time a hand appliqué block is finished, it is a little wrinkled. So I rinse the block in cool water, then let it dry overnight laid flat on a terrycloth towel. Once the block is dry, I give it a little spray mist, and press it with an iron from the BACK on a fluffy terrycloth towel. (Never press the front of applique – it flattens the applique, and could cause shiny edges at the turned under seam allowance.)


But, wait! OH NO! Some of the red cherry fabrics ran! See the pink halos around the cherries? (Insert your own words of distress here.)
 

No worries, I think I can fix this. Back to the basin, fill with cool water and add a spoonful of Dawn dishwashing liquid (original blue Dawn shown in the photo). Swish it around, and let the block soak in that a while, maybe an hour. Then rinse, rinse, and rinse again to get all the soap out. (No wringing or squeezing which could distort the block.)


Let the block dry once again. Hoooray! The pink halos are gone. Back to the ironing board, face down on the fluffy terrycloth towel. Spray a light mist to dampen the block, and the block is ready to press.
  

Looks good!
 
Students often ask “How did you do the tiny bird’s eyes?” Here is a photo of the fabric (with a penny for scale) that I used for these bird’s eyes. I seem to collect bird’s eye fabrics. This fabric was also available in white, but it was not handy, so I needleturned the pink under, leaving only the circles.
  

One of these days, I will blog step-by-step how I stitch really tiny circles. But, if you were in my Chattanooga workshop, you already know!

Keep stitching,
Barbara M. Burnham


P.S. This pattern and more are available on CD in the book "Baltimore Garden Quilt" or in full size printed patterns here: http://www.barbaramburnham.com/

(c) 2015 Barbara M. Burnham. All rights reserved. Reproduction of any kind is expressly prohibited without prior written authorization.

Thursday, July 3, 2014

Keeping a Quilt Journal

GUEST BLOG from my friend Misty Cole:

Keeping a Quilt Journal

Photos and text by Misty M. Cole

A friend of mine recently joined a long-term class to make a Dear Jane quilt.  It is composed of 225 unique blocks, and in the book that reproduces the 1863 patterns, Brenda Papadakis recommends putting together a journal before beginning your blocks. I saw my friend’s journal when she was working on her blocks at a meeting one day. I was about to begin work on a Baltimore Garden quilt, and I thought the binder idea was just fantastic. I decided to put together my own journal before I began appliquéing.


The binder is a nice structure for a quilt journal, since you can add or subtract pages as needed. My binder has pockets in each cover which is convenient for holding receipts, selvages or anything else you want to keep handy. To begin, I found a roomy binder.  I put a color copy of the full quilt in the front cover.

I filled the binder with page protectors. I printed out all my patterns from the Baltimore Garden CD, and put one in every other sleeve.  I made a journal template on my word processor, which had spaces for date begun, date finished, and notes about each block.  I printed out one sheet for each block in the quilt, and labeled each sheet with the block names and letters.


As  I prep each block for applique, I put my pieces into a small plastic baggie and slide it into the sleeve opposite my journal page for that block, where I stored the block pattern.  When I am done sewing the applique, I return the bag of freezer paper templates to the sleeve in case I need them later.
On each journal page, I list dates and notes as I sew. I list things like measurements I need to refer to later, or what was happening on the day I started this block (“I have a new niece!”). I can add in-progress photos.


Why keep a quilting journal? It helps keep a record of how long it took to complete a project. It is a way to stay organized so you don’t lose patterns or pieces of fabric or information. You can keep track of how much money you have spent on a project. It can be a great motivational tool, for those days you are feeling discouraged or bored with your project. It is a wonderful souvenir for long after your project is done.

Even if you do not want a binder journal, there are plenty of other options. Jot down your notes in a spiral notebook or blank journal dedicated to quilting projects.  You might even choose to keep a spreadsheet on your computer with simple information about each quilt, like title, size, year completed, where it currently resides, where it has been shown, etc.

You can print free journal pages at this website: http://www.quilties.com/projects/printable-quilt-journal-pages/

I have found my journal to be a very useful tool.  I hope you find a method of journaling about your quilts that works for you!

Thanks Misty, for being my guest blogger today!
Keep Stitching (and journaling),
Barbara M. Burnham

Monday, May 19, 2014

More Options for Baltimore Garden Quilts - Different Colors, Different Layouts

Nobody says you have to do an antique reproduction exactly like the original!

Playing on the computer, I made a "negative" image of my reproduction Baltimore Garden. Maybe this will be my next quilt? Blue is my favorite color....
... and maybe sew the blocks together a different layout instead of the original arrangement. In the picture below, all the blocks are the same, but rearranged around the center; just a little more balanced. Try this technique for planning your quilt layout -- print a color photo, cut up the blocks, rearrange, and paste the blocks down within the border -- a paper design wall!
So many options. What's next?

Keep Stitching!
Barbara M. Burnham

(c) 2015 Barbara M. Burnham. All rights reserved. Reproduction of any kind is expressly prohibited without prior written authorization.

Monday, January 20, 2014

Baltimore Fruit Bowl - Valuable Lessons

Over the years, I have been fortunate to attend lots of appliqué workshops, learning from many talented teachers and friends. None of these class projects were ever finished during class. Hand appliqué, especially Baltimore-style, is not known for instant gratification. However, I do not count the hours, I just enjoy them.

I was just going to make one block … this Fruit Bowl, in a class taught by Anne Connery.
 
 
Anne provided each student a pack of wonderful fabrics for the pineapple, the bowl, watermelon, and some leaves. Anne’s kits did not include background fabric – we were to bring our own. This turned out to be the "most valuable lesson" I learned from Anne in that class – always bring your own background fabric to class. That way, no matter what fabrics are used or offered in a project kit, your blocks are more likely to eventually go together in a quilt! That is probably why my “Pride of Baltimore II” quilt eventually became a finished quilt, instead of unfinished (and unrelated) blocks languishing in a closet somewhere.
 
The pineapple was another valuable lesson, and the biggest challenge for me. It is made by sewing criss-crossed lines of running stitches and then gathering them up to tie around a template. Challenging, but what fun! Blackberries were gathered a similar way. The bitten apple (a bit of broderie perse) and peaches were harvested from my fabric stash. (You can click on this photo for an extreme closeup.)

 
This is one block that wound up in my "Pride of Baltimore II" quilt, along with 11 others and the central medallion with the schooner. I'll publish more about those in future posts.
 
Pattern for this block can be found in “Papercuts and Plenty” by Elly Sienkiewicz.

(c) 2015 Barbara M. Burnham. All rights reserved. Reproduction of any kind is expressly prohibited without prior written authorization.

Tuesday, August 20, 2013

Inking and Signing on Fabric - Continued

To follow up on a previous blog post about Inking and Signing on Fabric,
http://baltimoregardenquilts.blogspot.com/2013/07/inking-and-signing-fabric-for-quilts.html

Fabrics best for inking:
•Choose a densely woven fabric – a tight weave. A loose weave or course threads will be more difficult to write on smoothly.
•Use light color solid or very subtle prints that will not compete with the inking.
•White-on-white printed fabrics can be challenging to ink because of the uneven raised surface. Sometimes the printed white designs wear away. Avoid those fabrics if you can, or accept that they will have limitations.

Prewash to remove sizing, avoid products that may leave a residue, and iron flat.
Test a sample of inking on the fabric and launder the sample.

Use inks that a safe for fabrics. Sakura Pigma® Micron® pens are permanent on fabric. Size 005 is best for very small, fine writing, but it must be used with a very light touch.

Inks used on antique quilts were formulated in various ways that were damaging to the fabrics. In her scholarly article about Ink Damage on Nineteenth-Century Cotton Signature Quilts, Margaret T. Ordonez also offers advice for those of us making new signature quilts: “Do not heat set ink in signatures with an iron unless directed to do so for a specific formulation” and “Plan quilting stitch patterns so that you do not quilt through signatures.” Uncoverings 1992, Volume 13 of the Research Papers of the American Quilt Study Group.

Here are more examples of how I have used inking on quilts.


See how the downstrokes of letters can be carefully thickened for emphasis?

With MS Word (and lots of fiddling) I made these words go around in a circle.

Larger size Pigma® pens are available. For these tall letters, I first outlined each letter on the banner fabric (before it was appliquéd), then filled in the letters with a larger pen. (Other options for big letters = applique , reverse applique, or use ultrasuede.)

Always label your quilts for future generations!

Find more information about inking in books by Elly Sienkiewicz, including alphabets, phrases and fancy Victorian words to trace. I love this image from Baltimore Beauties and Beyond Volume II, “Sign Thy Quilts!”

Search for calligraphy books, engravings, and graphics to trace. Antique quilts with inkings are wonderful inspiration! (More on antique inkings in another post).

Years ago, I learned inking techniques in classes with Susan McKelvey. Her books are out of print, but you can still find them. I am SO honored to have an original inking by Susan McKelvey on my friendship quilt. A treasure indeed!

‘Til next time, Keep Stitching!
©2013 Barbara M. Burnham


(c) 2013 Barbara M. Burnham. All rights reserved. Reproduction of any kind is expressly prohibited without prior written authorization.