Monday, May 19, 2014

More Options for Baltimore Garden Quilts - Different Colors, Different Layouts

Nobody says you have to do an antique reproduction exactly like the original!

Playing on the computer, I made a "negative" image of my reproduction Baltimore Garden. Maybe this will be my next quilt? Blue is my favorite color....
... and maybe sew the blocks together a different layout instead of the original arrangement. In the picture below, all the blocks are the same, but rearranged around the center; just a little more balanced. Try this technique for planning your quilt layout -- print a color photo, cut up the blocks, rearrange, and paste the blocks down within the border -- a paper design wall!
So many options. What's next?

Keep Stitching!
Barbara M. Burnham

(c) 2015 Barbara M. Burnham. All rights reserved. Reproduction of any kind is expressly prohibited without prior written authorization.

Wednesday, February 5, 2014

Baltimore Basket - Valuable Lessons in Applique

I was just going to make one more block … this Woven Basket, in a two-day workshop (many years ago) taught by Anne Connery; this time, with MAQ - Mid-Appalachian Quilters held at Shippensburg University in PA. We stayed in the college dorms, slept on cots (with no air conditioning in mid-July), shared meals in the Grand Dining Hall, made lots of new friends, and learned more Valuable Lessons in Applique.

 
Included on Anne’s supply list was: “Several yards of 1/8 inch bias strips, sewn, seams pressed to center. Store the finished strips on an empty cardboard roll to bring to class.” Those bias tubes would form the basket. Supplies also included freezer paper, fabric basting glue, Pigma Micron fabric pens, along with fabrics and the typical appliqué supplies. (Notice that I learned my previous lesson: always bring your own background fabric to class. That way, your blocks are more likely to eventually go together in a quilt!)
 
Anne first gave a wooden skewer to each student, and got a few puzzled glances.

She also provided a cardboard stencil that she had made, with thin lines cut out to represent each weaver of the basket. The horizontal lines were omitted (not cut out from the stencil), which helped hold its form.

In turn, each student used Anne’s stencil to draw permanent lines for each vertical basket weaver onto their background fabric. The Pigma Micron pen is permanent on fabric – other pens might run, smear, or disappear while working Anne’s method – (another Valuable Applique Lesson).

After the drawn lines dried, a dollop of glue was poured onto the shiny side of a scrap of freezer paper. Then we used the point of our wooden skewer to dip into the glue, and “paint” a thin line of glue along the drawn line, as we laid the bias tube centered along that line and onto the glue – just a little at a time, because the glue dries quickly. All that is left is to do is applique the basket that is all held firmly in place. (P.S. I still use this method to glue baste applique stems along a drawn line.)

Anne taught us how to determine, on such a complex block, what comes first, and what comes next, what goes on top of what, etc. That can be a challenge when looking at a black and white printed pattern.
 
We practiced a bit of reverse applique …   

 
inked a few details … 
 

… and we made one single scrap of white fabric look like a flower by inking details and dimension with feathery strokes of black and brown Pigma pens.

 
Before this block was completed, I had to (of course) add a tiny bluebird. I would also like to commend, in case you’ve noticed, the careful machine quilting done by my friend, Marty Vint. That couldn’t have been easy, going so carefully around all those appliqué pieces!
 

This basket block is in my Pride of Baltimore II quilt, along with 11 other blocks and a central medallion with the schooner. I'll write about more of the blocks, and Valuable Applique Lessons in future posts.


Pattern for this basket block can be found in the “Baltimore Beauties and Beyond” series by Elly Sienkiewicz.


(c) 2015 Barbara M. Burnham. All rights reserved. Reproduction of any kind is expressly prohibited without prior written authorization.

Monday, January 20, 2014

Baltimore Fruit Bowl - Valuable Lessons

Over the years, I have been fortunate to attend lots of appliqué workshops, learning from many talented teachers and friends. None of these class projects were ever finished during class. Hand appliqué, especially Baltimore-style, is not known for instant gratification. However, I do not count the hours, I just enjoy them.

I was just going to make one block … this Fruit Bowl, in a class taught by Anne Connery.
 
 
Anne provided each student a pack of wonderful fabrics for the pineapple, the bowl, watermelon, and some leaves. Anne’s kits did not include background fabric – we were to bring our own. This turned out to be the "most valuable lesson" I learned from Anne in that class – always bring your own background fabric to class. That way, no matter what fabrics are used or offered in a project kit, your blocks are more likely to eventually go together in a quilt! That is probably why my “Pride of Baltimore II” quilt eventually became a finished quilt, instead of unfinished (and unrelated) blocks languishing in a closet somewhere.
 
The pineapple was another valuable lesson, and the biggest challenge for me. It is made by sewing criss-crossed lines of running stitches and then gathering them up to tie around a template. Challenging, but what fun! Blackberries were gathered a similar way. The bitten apple (a bit of broderie perse) and peaches were harvested from my fabric stash. (You can click on this photo for an extreme closeup.)

 
This is one block that wound up in my "Pride of Baltimore II" quilt, along with 11 others and the central medallion with the schooner. I'll publish more about those in future posts.
 
Pattern for this block can be found in “Papercuts and Plenty” by Elly Sienkiewicz.

(c) 2015 Barbara M. Burnham. All rights reserved. Reproduction of any kind is expressly prohibited without prior written authorization.

Sunday, September 15, 2013

Machine Back-Basting for Hand Applique

Students in my year-long class at Bear's Paw Fabrics in Towson, MD are making great progress on their blocks. The lesson this month was back-basting on the sewing machine as a prep for hand applique. The border swags on my Baltimore Garden Quilt were done this way and the borders went so quickly! Students were skeptical at first, but they learned that it is very easy to do, and so speedy to applique! (All smiles!) The technique is described in the book, and we did a sample in class with just two sets of swags.

Of course, we also have to showcase some of their blocks in progress.


"Well, I didn't think I was going to like this technique, but I do!"
 
‘Til next time, Keep Stitching!
©2013 Barbara M. Burnham
 

Tuesday, August 20, 2013

Inking and Signing on Fabric - Continued

To follow up on a previous blog post about Inking and Signing on Fabric,
http://baltimoregardenquilts.blogspot.com/2013/07/inking-and-signing-fabric-for-quilts.html

Fabrics best for inking:
•Choose a densely woven fabric – a tight weave. A loose weave or course threads will be more difficult to write on smoothly.
•Use light color solid or very subtle prints that will not compete with the inking.
•White-on-white printed fabrics can be challenging to ink because of the uneven raised surface. Sometimes the printed white designs wear away. Avoid those fabrics if you can, or accept that they will have limitations.

Prewash to remove sizing, avoid products that may leave a residue, and iron flat.
Test a sample of inking on the fabric and launder the sample.

Use inks that a safe for fabrics. Sakura Pigma® Micron® pens are permanent on fabric. Size 005 is best for very small, fine writing, but it must be used with a very light touch.

Inks used on antique quilts were formulated in various ways that were damaging to the fabrics. In her scholarly article about Ink Damage on Nineteenth-Century Cotton Signature Quilts, Margaret T. Ordonez also offers advice for those of us making new signature quilts: “Do not heat set ink in signatures with an iron unless directed to do so for a specific formulation” and “Plan quilting stitch patterns so that you do not quilt through signatures.” Uncoverings 1992, Volume 13 of the Research Papers of the American Quilt Study Group.

Here are more examples of how I have used inking on quilts.


See how the downstrokes of letters can be carefully thickened for emphasis?

With MS Word (and lots of fiddling) I made these words go around in a circle.

Larger size Pigma® pens are available. For these tall letters, I first outlined each letter on the banner fabric (before it was appliquéd), then filled in the letters with a larger pen. (Other options for big letters = applique , reverse applique, or use ultrasuede.)

Always label your quilts for future generations!

Find more information about inking in books by Elly Sienkiewicz, including alphabets, phrases and fancy Victorian words to trace. I love this image from Baltimore Beauties and Beyond Volume II, “Sign Thy Quilts!”

Search for calligraphy books, engravings, and graphics to trace. Antique quilts with inkings are wonderful inspiration! (More on antique inkings in another post).

Years ago, I learned inking techniques in classes with Susan McKelvey. Her books are out of print, but you can still find them. I am SO honored to have an original inking by Susan McKelvey on my friendship quilt. A treasure indeed!

‘Til next time, Keep Stitching!
©2013 Barbara M. Burnham


(c) 2013 Barbara M. Burnham. All rights reserved. Reproduction of any kind is expressly prohibited without prior written authorization.

Monday, July 22, 2013

INKING AND SIGNING FABRIC for QUILTS


Students and friends have asked about how I do the writing on my appliqué blocks. As promised, here are my recommendations and method, with lots of photos.

 
For fancy writing, I first make the design in Microsoft Word, and type out words in Kunstler Script Bold font, which most closely resembles the writing I have seen on antique quilts. Use a font size that you can actually write (not too small). Copy the words twice and print on paper. Cut out one copy of the words for tracing. Set aside the second copy for visual reference. HINT: Including a straight line or two will help with straight placement.

Did you think my writing was freehand? Sorry, my freehand writing will never be as pretty as Kunstler Script. If you do not have a computer, and are nervous about signing a block, write out your signature on paper first. You can make sure the writing fits the space or centers where you want it to be on your block. Then trace it as described below.

* Always practice on a sample of the same fabric.
* Fabric must be completely dry or the ink will bleed.
* A light box is indispensable for tracing.

I use Sakura Pigma® Micron® pens, which are permanent on fabric. Size 005 is best for very small, fine writing, but it must be used with a very light touch. Notice that there is a huge difference between 05 and 005 – Closeup below compares Size 005 at left, Size 05 at right.)


Procedure:

1.  Place the block FACE DOWN on the light box.

2.  Where the inking will be done, stabilize the BACK of the fabric, to help the pen move smoothly across the fabric, or the pen may catch on the threads as it moves. Transparent tape is easy to see through for tracing. Use clear packing tape for larger areas.


3.  Turn on the lightbox. Place the printout FACE DOWN on the BACK of the block. Align the printout, and tape that down securely. I have used regular office tape on top of the packing tape (easy to adjust or move it if needed.)


4.  Turn the block over FACE UP on the light box. Keep the second copy of words nearby for reference, so you can better see details of the letters.

5.  Take your time. This is not a job to be rushed. Get comfortable, take a deep breath, and brace your hand on the lightbox. Use a very light, steady hand to write. Use the Pigma pen like a paintbrush, brushing the ink softly. Too much pressure can damage the pen’s fine point. Do not allow the pen to stay on one spot for very long, or the ink may blot as the fabric soaks up the ink.

6.  Ink all the words as single strokes first. You can darken the downstrokes of letters or add details later, if desired. (Like salt in soup, ink is easy to add, nearly impossible to remove.)

7.  Turn the lightbox on and off frequently to help you determine the effect, and the amount of ink or pressure desired.


8.  Last step, and VERY important – REMOVE all the tape before ironing or wetting the block!  NEVER leave any tape on fabric long term.


Allow the ink to dry completely, 24-48 hours, before wetting the block.

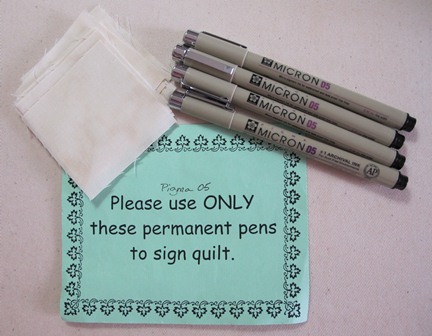
Signing blocks for a signature quilt. Size 05 Pigma pen is best when many people will sign freehand on fabric. Provide them with sample fabrics (with tape on back) to practice. Don’t let them use regular ink pens! Bellwether Dry Goods makes signature quilts for weddings, and they provide this little sign with the pens:


* * * * * * * * * * * * * * * * * * * * * * * * * * * * * * * * * * * * * * *
Years ago, I learned inking techniques in classes with Susan McKelvey. Her books are out of print, but you can still find them. Also find more information and inking techniques in books by Elly Sienkiewicz, including alphabets, phrases and fancy Victorian words to trace.

Inking can be used to trace images from calligraphy books, engravings, graphics, even trace from your photos onto fabric. Embellish your appliqué with inking – Pigma pens are available in lots of colors. Label your quilts! I could go on and on about inking – I’ve done lots of different things with Pigma pens. But this post is already too long.


See more inking tips here: Inking and Signing on Fabric - Continued


‘Til next time, Keep Stitching!
Barbara M. Burnham

(c) 2013 Barbara M. Burnham. All rights reserved. Reproduction of any kind is expressly prohibited without prior written authorization.

Thursday, July 18, 2013

Applique Organizer Folders (Continued)

This is a followup to yesterday's post (Click here) about Applique Organizer Folders. 

Glenda posted a comment that "Threaded needles could probably be kept here as well."

She is so right! Here are pictures of my needle folder. I can thread lots of needles in advance for teaching a class, doing demos, traveling in the car, quilting, or preparing for any sewing project. It saves a lot of class time. I don't have to thread needles in a hurry, or while bumping along in the car.


Needle Organizer

This folder was made the same way as the Applique Organizer. Then I added an extra piece of batting, folded in half, along the top. This is simply pinned onto the glued batting with long quilter's pins -- the ones with the big yellow ball. (Flat ones would be even better.)
Because this batting piece is loose, I can easily insert my various threaded needles, extra ball point pins, etc.

The threads are then laid flat on the batting where they will cling. The top flap folds down to secure all the needles even more. You don't want them slipping out!
(Note to self: Attach a little flat magnet to hold empty needles!)


At the bottom half of the folder, there is a folded scrap of muslin just laid on top. This makes all those loose threads behave when I remove a threaded needle -- as I remove a threaded needle, I place my hand on this muslin scrap -- it helps "contain" all the other threads and prevents tangles. I used the pinking cutter to trim the muslin, so it will not ravel.

P.S. I love the pinking cutter blade to cut out my applique blocks -- they don't ravel with all that handling of the block. Then I trim the blocks to size with the straight cutter before assembling my quilt.

Keep Stitching!
Barbara M. Burnham

(c) 2013 Barbara M. Burnham. All rights reserved. Reproduction of any kind is expressly prohibited without prior written authorization.