Thursday, December 27, 2012

Woman's Day 1965 - The Met Quilt

October 1965 issue of Woman's Day magazine included an article about a beautiful "Baltimore Friendship Quilt." The article, by Roxa Wright, told how the quilt "was discovered in storage shelves of the Mount Vernon Ladies' Association of the Union, an organization which maintains George Washington's old home on the Potomac River." The quilt was "anonymous in every way."

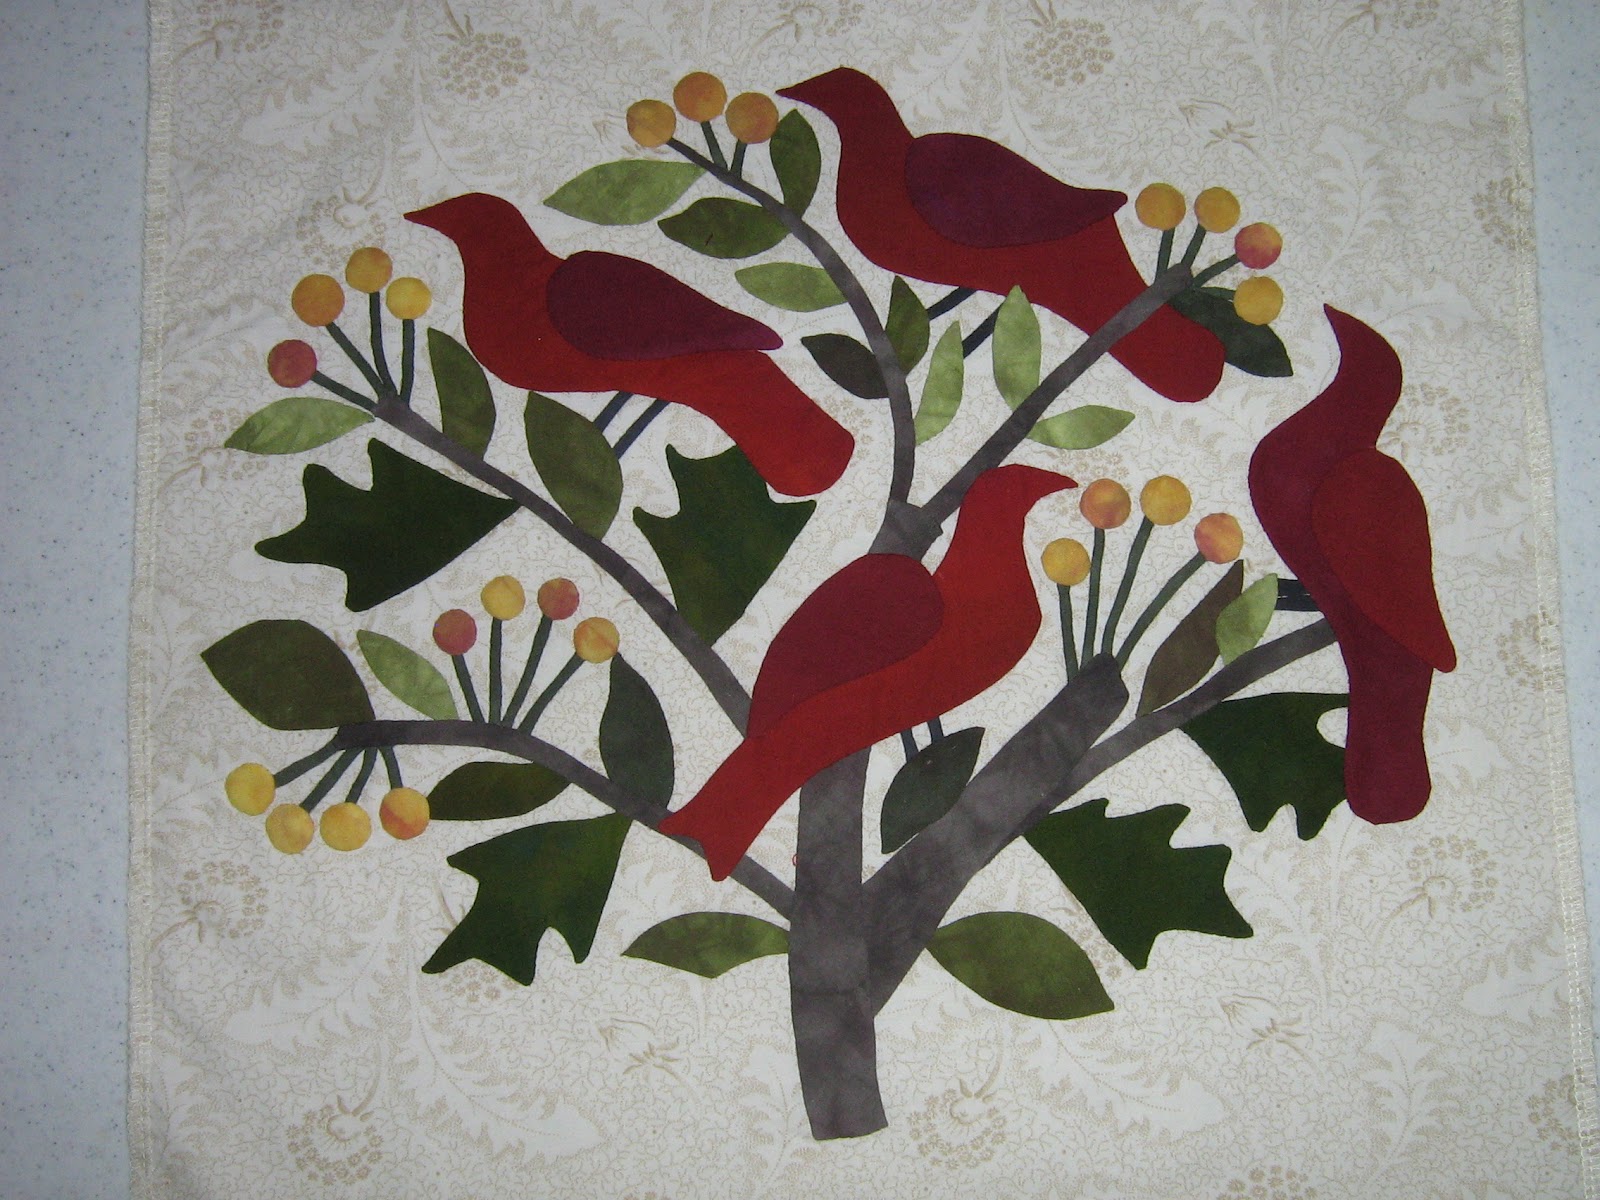
"The Met Quilt," as we often refer to it today, was later donated to the Metropolitan Museum of Art in New York City. A nearly identical quilt resides in the Baltimore Museum of Art, often referred to as "The Sliver Quilt." Other quilts have since been discovered with similar patterns and some of the same fabrics, many with inscriptions and dates from the 1840-50 era. After much research by scholars and historians, the maker (or makers) remain unknown.

The quilt was reproduced and photographed for the article, and a pattern was offered by Woman's Day for $1.00. The pattern was printed half-size thus had to be enlarged 200% (by hand). Remember, that was 1965, long before enlarging photocopiers! When enlarged, the patterns are 32 inches square, 16x32, and 16 square.
In 2005, the Folsom Quilt Guild produced a raffle quilt from the same pattern, and sold copies for $50, but they do not offer it any more. It is obviously an ambitious quilt to make, but many quilts have since been created with the Woman's Day pattern.

I feel fortunate to have an original pattern from the Woman's Day offering - the poor thing is yellowed and falling apart at the folds - but well loved, and actually used to make quilts today.
 
 
Happy Stitching!
Barbara M. Burnham
(c) 2012 Barbara M. Burnham. All rights reserved. Reproduction of any kind is expressly prohibited without prior written authorization.


Tuesday, November 13, 2012

In the News - Online Quilt Magazine

Free Online Quilt Magazine

A friend sent me a note about a nice review of Baltimore Garden Quilt in the Online Quilt Magazine. The Book Review was written by Annette Mira-Bateman in the November 2012 issue.
It's on page 18! There are also interesting articles written by quilters and quilting teachers around the world, plus free patterns, quilting tips and Readers' Show and Tell.
Here is the link for the November 2012 issue:
http://www.onlinequiltmagazine.com/downloads/oqm-std-2012-11.pdf

Anyone can sign up to receive the Online Quilt Magazine. every month, and it's FREE. To subscribe, you only have to provide your first name and email address to receive notice of each issue. They send you an email with the link to each issue and then you can download the magazine.

Tuesday, October 9, 2012

Satin Rose with Trapunto and Broderie Perse Butterfly


Satin Rose Trapunto and Broderie Perse 

Invitation to a Workshop with Barbara Burnham
Learn to hand applique and trapunto a dimensional single stemmed rose made with glossy satin fabric. Add a broderie perse butterfly and finishing touches with delicate inking or embroidery. Learn how to handle unusual (non-cotton) fabrics so you can add interest to your hand applique projects!
Join us at
Seminole Sampler Quilt Shop, 71 Mellor Avenue, Catonsville, MD 21228

Saturday: October 20, 2012  10 a.m. - 4:30 p.m.
Call 410-788-1720 or toll free at 866-407-2363 to register. Cost is $45 (plus $15 kit fee).
Kit includes the pattern, all the fabrics, butterfly, stuffing for the satin rose, freezer paper, and threads to match applique.

(c) 2012 Barbara M. Burnham. All rights reserved. Reproduction of any kind is expressly prohibited without prior written authorization.

Friday, August 24, 2012

Baltimore Applique Society's Lady of Victory Quilt

My friend Taryn wrote recently about the unveiling of the Lady of Victory opportunity quilt on her blog "Reproduction and Antique Lover"  with photos of the lovely applique block she made. So, I thought I would share the story about this quilt, and photos of the block I made.


How the project came about: Mary Koval purchased a beautiful Baltimore Album quilt. The center block is Baltimore's "Battle Monument" and at the top of that monument stands the Lady of Victory -- thus the name "Lady of Victory Quilt." Mary has since donated the antique quilt to the Wisconsin Museum of Quilts and Fiber Arts in Cedarburg, Wisconsin.
The patterns: Mary graciously gave her permission to the Baltimore Applique Society to produce the Lady of Victory quilt patternThe pattern set includes 25 - 18"x18" patterns, border patterns, information on the history of the quilt, and a CD-ROM with a high-resolution photo of each block. Proceeds from pattern sales will help the BAS further its goals to help museums preserve antique quilts and to promote the art of applique.
The opportunity quiltBaltimore Applique Society then produced an opportunity quilt from the pattern set. BAS members volunteered to stitch the blocks, then all the embroidery details were added. Blocks were to be made as close to the antique quilt as possible. Volunteers were each given a kit with all the fabrics, a photo of the antique block and a pattern to work from.
     Here are some closeups of the block that I stitched. Lots of techniques on this block! The eagle's eye is an oval fussy-cut. I tried to keep the edges nice and smooth, but keep the little lines that look like eyelashes. It was a challenge to needleturn such a tiny piece by hand! But that beak was the most difficult challenge -- to get that red part flat underneath and then cover all the edges with the inner and outer points on the beak.

To make this flower, I sewed strips of red and pink together, then cut the petals out one at a time; the same way we often make split leaves from two green fabrics.
Berries were made the same way.
... and a little split bud. The little pointy red bud but was done with reverse applique. The eagle's yellow feathers could be done with reverse applique, or applique on top. I chose to stitch them on top -- I basted them on in a group as one piece, then cutaway excess a little at a time.
The flag is red stripes only, just like on the antique quilt. The star on the flag was MUCH easier to stitch by stacking two triangles crisscross.
I hope you enjoyed this little applique closeup tour. I can't wait to see the whole quilt in person, all quilted!
Keep Stitching!
~ Barbara

Tuesday, August 14, 2012

Annette of Alberta's Baltimore Garden Blocks

One of the first questions people ask when starting an applique project is, "How do I choose fabrics?"

You are only limited by your imagination and the fabrics available to you. However, it is always interesting to see what other stitchers have done. They may take your imagination to new places.

Annette J. of Alberta, Canada is stitching applique blocks from the book "Baltimore Garden Quilt." She has a company called Natures Colors, and she is using her own hand dyed fabrics in a rainbow of colors. So her take on this quilt is quite different from the antique red-and-green color scheme. With her permission, I can share her photos here. Thank you Annette!

Enjoy "nature's colours" stitched by Annette:


Tuesday, July 31, 2012

Cynthia in Texas - Broderie Perse Applique

Cynthia in Texas has been busy stitching her Baltimore Garden Quilt blocks with a beautiful twist. She is adding a broderie perse technique, cutting motifs such as flowers and birds from various fabrics. Cynthia is a master at finding just the right fabrics, and using them to their best advantage.

We have seen Cynthia's Block B1 in a previous post, and I've been anxious to share more of her blocks. Now she has finished several more blocks, and here they are (with Cynthia's permission, of course). This one, a floral block with trios of roses in pinks, reds, and burnt orange. Check out these bursting rosebuds, with just a bit of the rose motif in the calyx, and added sets of newly formed rosebuds.


Then, Cynthia completed a wreath with four open blooms - not sure what the flower is called, but it sure is appropriate for this lovely wreath.


Next, a sprouting garden of pinks and iris, and a wreath of old fashioned roses. Several leaves are also carefully cut from her focus fabric.


Here is Cynthia's version of a Woven Basket. Are you noticing all the little tendrils? There are even some tiny morning glory buds to promise more blooms for tomorrow.

And a coordinated vase of full-blown roses, of course, complete with their buds and leaflets.


Perfect for a four-block set!
Cynthia continues on, (there is no stopping her!) to make the same Vase block again, this time, featuring a cutout of a maiden pouring water from a jug. Quite an inspiration for creative use of printed fabrics, don't you think? (And look closely - there are TWO birds in there!)


Note From Cynthia:  The floral fabric is Love Letters by Laundry Basket for Moda. The toile border (and a bit on the baskets) is Garden of Enchantment by Maywood Studio. The background toile is Reflections by Ro Gregg for Paintbrush Studio. 

Thursday, July 12, 2012

Baltimore Garden Quilt Fabric Suggestions

The search for just the right fabric continues!

Quilters have sent me questions and suggestions about fabric choices for their Baltimore Garden Quilts, and other 1850s reproduction red and green quilts. As fabrics go out of print and new ones become available, I will try to post more suggestions. Several stitchers are doing blocks with broderie perse fabrics. Those I will list in another post very soon, with lots of photos!

Here are some fabric lines suggested by friends, and shop owners, and some that I have used. The first ones listed may be available now, or have been out for a year or two. Later in my list are newer lines coming soon.

Turkey Red РThere are a lot of nice Turkey red solids and subtle prints available all the time. However, I would NOT recommend Kona Рit is too thick and heavy for fine appliqu̩ and especially too thick for multilayer flowers.

Here is a red fabric that I have really enjoyed using for multilayer flowers, Robert Kaufman "Fusions" Screen Print D# 5573 (pictured below). This multilayer flower is from the Block B3 pattern; the most complex layered flower in the book, Baltimore Garden Quilt. See how the subtle shading makes it look like each petal was stitched on separately?


For greens and yellows, the following choices are wonderful, if you can still find them:

Windham Fabrics - Baltimore Album ca 1847 – Mary Koval
http://www.windhamfabrics.net/cgi-bin/fabricshop/gallery.cgi?Category=436&View=All&v=1

Windham Fabrics - Mary’s Blenders – Mary Koval
http://www.windhamfabrics.net/cgi-bin/fabricshop/gallery.cgi?Category=479&View=All&v=1

Andover Fabrics - Crimson and Clover – Jo Morton
http://www.andoverfabrics.com/Grid.php?GroupName=Crimson and Clover by Jo Morton

Andover Fabrics - Crimson Bouquet – Jo Morton
http://www.andoverfabrics.com/Grid.php?GroupName=Crimson Bouquet
(A-5085-Y is a fabulous golden yellow!)

COMING SOON, OR LATER THIS YEAR

A friend who recently attended Quilt Market posted an update of future fabric ranges on her blog. Here are some you might want to consider for your Baltimore Garden Quilt.
Here is a fabric line I am really looking forward to! PERFECT yellows, PERFECT greens, and one potential Turkey red print (available 11-20-2012):

Windham Fabrics, New Colonies by Nancy Gere:
http://www.windhamfabrics.net/cgi-bin/fabricshop/gallery.cgi?Category=595&View=All&v=1

Blue Hill Fabrics has some good candidates for yellows and greens in Pomegranate – Rocky Mountain Quilt Museum:
http://bluehillfabrics.net/collections/item/41-pomegranate

There might be a green candidate here:

Marcus Fabrics - Tavern Collection Greens – Paula Barnes
http://www.marcusfabrics.com/cgi-bin/fabricgallery/gallery.cgi?Category=659

The next two collections will be popular for Baltimore Album quilts – definitely also on my list:

Newcastle Fabrics - Prussian Blue – Pamela Weeks
http://newcastlefabric.com/gallery/item/35-prussian-blue

Little Pink Stars – Margo Krager
http://newcastlefabric.com/gallery/item/22-little-pink-stars

If you find other great fabric candidates, please post a comment!

Here is another find (thank you Charmaine!) from Andover Fabrics - IQSC Square in a Square (available September 2012)
http://www.andoverfabrics.com/Grid.php?GroupName=IQSC Square in Square


Friday, July 6, 2012

Morning Glory Bluebirds


Following up on an earlier post, More Excuses to Buy Fabric (as if we need excuses), I suppose that post was a bit of a teaser, since I didn't show the whole quilt. So here is a picture of the whole quilt.

Morning Glory Bluebirds, 63"x63" made by Barbara M. Burnham

This quilt is one of my favorites, as I am a HUGE bluebird fan. We are so fortunate to have bluebirds raise their young in a nestbox in our backyard every summer.

The morning glory wreath block is from a series of applique patterns called "Joyce's Garden" in the 1980s. The first blue block turned out so pretty, I made a pink one. Those two blocks languished in a closet for years. Then one day, I decided to try designing some bluebirds on the blocks. They turned out pretty too, but then they sat in a closet for a few more years. Later, we moved to our current home and immediately put up a bluebird box. Within 15 minutes, we had bluebirds inspecting the box! Ever since then, we have had bluebirds nesting in our backyard.

To quote my friend, Wendell Long: "Nothing exceeds the wonder and magic of the first flight of a bluebird." You wait for hours to see each nestling take that first scary flight from the safety of their nest and head for the trees, or sometimes, land somewhere totally unintended. They are SO much fun to watch as they learn to hunt for bugs and chase one another around the gardens. That is what inspired me to design this quilt’s border with the fledglings hiding among the morning glories, begging for caterpillars.
For the hand quilting, I used a stencil with a woven trellis design (for the morning glory vines to climb on), and Quilter’s Dream Request Cotton. It was a challenge to keep the overs and unders of the trellis marked correctly!

This quilt has won some ribbons, some of them blue. One of the judge’s comments said the birds did not have enough contrast (blended in too much). They didn’t realize that my intent was to emulate nature’s camouflage – that was kind of the point of blending them in. You have to really look for them. I think judges often don’t have much time to enjoy the quilts.
 

Thursday, June 28, 2012

Baltimore Grid

What is the "Baltimore Grid?"
Instead of cross hatching, I often hand quilt my applique quilts with the Baltimore Grid pattern. The Baltimore Grid forms an X in the center, and lines echo from that X. It is easy to do! There is a stencil available, but it doesn't fit every situation. (The same stencil is very handy to mark a Chevron border - you just use half of the stencil.) Here is a link to the stencil to see what it looks like:
http://quiltingstencils.com/baltimoregrid16.aspx

The Baltimore Grid is easy to mark to fit any applique design. You can alternate direction on each block, or follow the X pattern across an entire quilt. Here is how I used the Baltimore Grid pattern on my Bluebird Basket quilt.


From the back:


How to Mark the Baltimore Grid
For a single block -- say you have a 12 inch block -- put a pin at each 1-inch on all 4 sides of the block. These marks will be evenly spaced across the block. A block seamline or sashing can be the stopping point or change of direction. Mark diagonal lines with a hera marker from point to point, or use blue painter's tape to mark the quilting lines. If you use a water soluble marker, you can mark dots at the inch marks to guide placement for each line of painter's tape. Be sure to quilt along the correct side of the tape.

For blocks that do not measure in exact full inches, cut a length of paper the same length of the block. Fold the paper into even sections (in half, then half again, etc.) until you have folds that are all equal, close to an inch or so. Mark the correct fold lines on the paper with a pencil. Use the marks at the edge of the paper to place pins or marks.

On my large center block, I used the red dogtooth as equal points, and at the center sides, center top and center bottom, I changed direction. Marking only a quarter of the block at a time, I used a long strip of blue painter's tape at vertical and horizontal to mark my center stopping points. I marked the lines with a hera marker along a clear plastic ruler. You don't see a center X because of the applique, but the diagonal lines sometimes continue through spaces between the applique.


There is also a feather vine here, which interrupts the grid, but the Baltimore Grid lines are all continuous, out from the center on this quilt and through the borders.

Here's another bonus - when you finish quilting the grid, maybe you will want to quilt some more, and decide to do cross hatching, or add quilting in some or all of the quilt. You are halfway there! That is exactly what happened with this little quilt. When I pulled out all the basting stitches, it just was not enough quilting to suit me. The quilt was nice and square, so I bound it, and then quilted between each line, all by eye - no more marks were needed.

Sunday, June 24, 2012

Lori Smith Fit-to-Frame

To follow up on an earlier post,
http://baltimoregardenquilts.blogspot.com/2012/04/echo-quilting-by-hand.html
I finally finished binding this little quilt. The pattern was designed for Lori Smith's Fit-to-Frame series, but I decided to finish the wall hanging with no frame.
At Caron's request, here is the finished piece.


Echo quilting by hand is something I really enjoyed, and can't wait to try again!

Saturday, May 19, 2012

George's Cherry Tree with Birds

The antique quilt featured in the book Baltimore Garden Quilt was made with a traditional red and green color scheme, with highlights of yellow. Block B1, which I call George's Cherry Tree, features four birds enjoying the cherries.


On the antique block you can see some wearing away of the fabrics. The birds' legs were stitched with black fabric, and that fabric is mostly gone, as well as some of the Turkey red. But I was able to capture all the details for the patterns in the book by following the applique threads that were left behind.

My red and green reproduction block of this block is pretty much identical, faithful to the original.

However, these patterns can be done in any colors you choose! Readers and friends have been sending me photos of their blocks, and WOW, they are beautiful!

Cynthia in Texas sent me a photo of her Block B1 -- She has flown in some different birds! Cut from a favorite fabric of hers, the birds on her Baltimore Garden block are strategically cut from the French Journal Collection by London Portfolio for Michael Miller. Of course, I had to go buy some of that! :-) Cynthia inspires me to try some broderie perse!


And here is my latest version of Block B1. Plaid fabrics are a favorite of mine, and I try to use them wherever I can. The yellow birds' wings are fussy cut from a flower. I wasn't quite sure how this background would work out either -- it is a little busy -- but hey, it was fun!


I wonder what the original quiltmaker would think, if she could see these new blocks today ...

Barbara

Tuesday, May 15, 2012

More Excuses to Buy Fabric

When shopping for fabric, if a fabric that catches your eye, or just looks interesting, buy some!
If you don't buy it now, it won't be there when you come back. That's my motto. You just never know when it might come in handy for fussycuts ...


Sometimes it can be as subtle as a tiny green worm hiding among the green leaves and vines. I love to put surprises in my quilts.
But really now, do we EVER need EXCUSES to buy fabric!?!

Sunday, May 6, 2012

No Sticky Stickers Please

If you ever make fabric kits, such as for a block-of-the-month, for group projects, or for someone else to use, please don't ever use sticky labels to mark fabric numbers to match with a pattern. Over time (and not a very long time) they will get gummy, and leave a residue on the fabric that cannot be removed. The fabric might be completely unuseable, especially if it is in the smack-dab in the center of the piece. If you absolutely must use a sticker, just put it in a corner, or on the back, but not in the center of the piece!
The sticky labels can also fall off the fabric. Staples are no better, because they can rust, leave holes in the fabric, and are difficult to remove without a tool.
If you ever purchase a kit with stickers on the fabrics, get the stickers OFF the fabric ASAP and re-label your fabrics some other way until you are ready to use them.
Recently I bought a block-of-the-month set -- a beautiful design with great fabrics -- second hand from someone who collected them all for that year. Every piece of fabric had a huge label, slapped down in the middle of each piece. Here is a solid black piece, where the sticky label left residue.


 So I went through all the fabrics, for the whole year, removed the big sticky labels, cut each one down to minimum size, and put them in corners. Here's hoping the fabrics will all be useable. (And glad I have stash to substitute.)


Here are some ideas to use instead:
* Lay the fabrics staggered far enough apart to see the labels, and take a digital photo, close enough that you can still read the labels. Print the photo and remove the labels.
* Clip off a small piece of the fabric, and glue or staple each fabric to a paper next to its label.
* If you are making kits, provide a color copy of this paper - well worth the extra few pennies.
* A full-color page of numbered swatches with fabric measurements can be used for assembling kits. The same fabric key, if included in a pattern, can be used by the quilter for fabric shopping or pulling from stash.